
March Flower Focus: Anemones
Anemone

Spring blooming anemones (not be confused with late summer blooming anemones I’ll tell you about later) are one of the first flowers of spring here in Virginia, given that most flower farms plant the corms in fall and overwinter them in unheated tunnels.
The eye of the anemones is what make them a stand out, especially the varieties with dark centers that add a stunning level of dimension. They last for over a week in the vase, and they are easy to arrange with given their sturdy stems.

Fun fact and quick warning to keep you from panicking if you see this happen: anemones are nyctinastic, meaning the flowers close up at night and open again in the morning. So though your flower arrangement may begin to look different at sunset, it will regain its full faced look by morning light.

Anemone symbolism: In Victorian times, anemones represented forsaken love. Today it seems that symbolism is based more around the color of the anemone.
Red represents the traditional Victorian symbolism, whereas white symbolizes purity/new beginnings, pink symbolizes platonic love/friendship, and purple symbolizes protection from evil.
Speaking of the color purple, one of my favorite works from Henry Matisse is Purple Robe and Anemones, shown below. I always say that anemones will convince any muted tone lover such as myself to embrace bright colors, and this piece is a perfect example of that.


Favorite Flowering Shrubs
Abelia (Summer/Fall Bloomer)
Abelia is one of the most perfect flowering shrubs, as it checks off all the boxes one is most likely looking to find in a foundational shrub. It is deer resistant, drought + heat tolerant, semi evergreen, and later flowering - meaning that it will give you a beautiful display of blooms when most other flowering shrubs have finished their show. It’s also a pollinator magnet: I find hummingbirds and hummingbird moths every day on my Abelias when they’re in bloom.
There are several Abelia varieties to choose from, and it’s important to note that they can vary greatly in heights. There are compact varieties, such as Abelia ‘Rose Creek’ and ‘Little Richard’, which grow to about 4’ high. These are perfect if you’re looking for shrubs to be placed near windows or in the middle of a wide border. There are also tall varieties that can be used to create privacy hedges or shrub borders. Abelia ‘Grandiflora’ is the perfect variety for that.

Mock Orange (Spring Bloomer)
Mock Orange (Philadelphus) is the most sweetly scented flowering shrub that is covered in rose like blooms during the early spring. Though the flowering window is short, the shrub is a wonderful background plant during the whole season, as it’s covered in oval shaped rich green leaves.
Mock Orange is an easy and fairly fast grower, but please note that it has not proven to be deer resistant - at least at my farm. They are commonly nibbled upon and have had their flower show interrupted because of it. Thankfully this doesn’t seem to kill their spirit, as they continue to grow despite the many sporadic prunings. However, their maturity has definitely been stunted because of it.
The main species of Mock Orange (Philadelphus coronarius), one most commonly found in historic gardens, can reach up to 12’ tall at maturity, making it a beautiful hedge if you don’t mind it being bare during the winter months. There are other varieties that are more compact, such as Philadelphus coronarius ‘Aurea’ (5-6 feet tall) and Philadelphus virginalis ‘Snowbelle’.

Spicebush (Early Spring Bloomer)
A native alternative to Forsythia, Spicebush (Lindera binzoin) offers the same lovely yellow blooms in early spring and can be used as a cut flower in arrangements. Glossy berries follow the blooms, and the foliage turns to a beautiful shade of golden yellow in the fall. Spicebush is easy to grow and tolerant of many conditions, and it is deer resistant.
Just as with Forsythia bushes, these are deciduous and are not as dense in foliage as other shrubs. For that reason, I like to plant these alongside evergreens or fuller foliage shrubs such as Mock Orange. Spicebush shrubs grow 6-12 feet all, so they are best at the back of a border or planted within a tall hedge.

Ninebark (Spring/Summer Bloomer)
Ninebark (Physocarpus Opulifolius) is a native, easy to grow shrub that blooms late spring-early summer. Depending on the variety, its flowers are white or light pink, and it also has foliage options of yellow green or dark burgundy.
Personally I love the dark foliage Ninebark plants (such as the Summer Wine varieties), as they make an incredible statement in the garden, adding a bit of moodiness and depth to a space. I’ve found the dark foliage varieties work best planted amongst neutral tones of whites and beige, or muted tones of yellows, purples, and pinks - though it could also be a nice backdrop for bright reds!


Virginia Sweetspire (Late Spring/Early Summer Bloomer)
Virginia Sweetspire (Itea virginica) is a native deciduous shrub that becomes heavy with white flowers in spring and has foliage that becomes a beautiful purply red in autumn. The most commonly found variety of Sweetspire is ‘Henry Garnett’, a variety reaching about 6 feet tall at maturity. Sweetspire works well alongside evergreens and shrubs and perennials with more of an upright habitat to complement its somewhat floppy nature. It also is beautiful planted en masse. Unlike the other shrubs listed, Sweetspire thrives in dappled sunlight as opposed to direct sun, so it is perfect to planted alongside trees.
*Please note that Itea does spread slowly through suckers to form dense colonies over time. These suckers are easy to pull up to contain its spread, but that does add a level of maintenance to consider if you’re hoping to have a uniform shrub look and/or you’re planting it amongst other shrubs and plants that you don’t wish to have choked out.

Bridal Wreath Spirea (Spring Bloomer)
Bridal Wreath Spirea is a mounding shrub with slim nodding limbs that are heavy with tiny white florets cascading down in mid spring. It grows about 6-8 feet tall at maturity and is easy to grow in full sun. Mature plants tend to be ignored by deer, but they may need protection in the first couple years after planting.
Bridal Wreath is the perfect name, as its long limbs bend easily to form wreaths or flower crowns. Petal confetti will be abundant as its flowering window closes, and the wind typically takes care of the piles that amass around it.


My Five Favorite Dahlia Forms (and how to incorporate them into your garden)
Let’s be real: you can’t go wrong with a dahlia in your garden, no matter which one you grow. Their shrub like form adds depth to a space even when they’re not blooming, and their blooms ultimately become a beautiful garden firework show that ends the growing season, as they hit their stride when many other summer flowers have begun to fade.
That being said, there are many forms of dahlias out there. In fact, the American Dahlia Association lists 29 forms on their website, which can be a lot to swallow when you’re just beginning your guaranteed love affair with this magical flower.
Which is why I created this short list of the five dahlia forms that are perfect as your introduction to growing them, and at the end I’ll explain just how to work them into your flowering borders and gardens.
Ball Dahlia
The ball dahlia is aptly named for its perfectly symmetrical round shape comprised of rolled up petals that will create a flower ball. They are a sturdy variety of dahlia that grow on strong stems and have the longest vase life of all other dahlia varieties.
Personal favorites: Cornel Bronze, Copper Boy, Boom Boom White, Linda’s Baby, and any in the Jowey Series (they come in a variety of colors)

shown above: Linda’s Baby (pink) and Maarn
Pompon Dahlia
Though they’re known as Pompon dahlias, I’ll forever call them “Pom Pom” dahlias in my mind because their small, cute round flower heads always make me think of those fluffy craft puffs.
Pompon dahlias are essentially a smaller variety of ball dahlias, growing on shorter plants and featuring round faces that are 2-3 inches versus the typical 4-6 inches of ball dahlias.
Favorite varieties: Tiny Treasure, Butter Cup, Amber Queen

Pictured above: Tiny Treasure
Dinnerplate Dahlia
Dinnerplate dahlias are true showstoppers, but I need to get technical for a moment: this is an unofficial label for dahlias that typically fall under the official labels of formal decorative or informal decorative dahlias. The easiest way to tell those two apart is by the petals. Formal decorative dahlias have flat, evenly spaced petals, whereas informal decorative dahlias have an irregular arrangement of slightly curvy or twisted petals.
The reason these two groups began to be unofficially labeled as dinnerplate dahlias is because no matter how the petals lay, they both tend to produce very large flower heads- sometimes the size of a dinnerplate!
Due to their very large heads being held up by fairly skinny stems, dinnerplate dahlias can become a bit droopy on the plant. Their large flower heads are also prone to breaking off of stems easily when weaving them into flower arrangements. Nonetheless, they’re still worth growing for the sheer fact that they’ll definitely be a garden statement AND make you feel like a gardening wizard. Holding a flower the size of your face that you grew yourself offers quite the grower’s high!
Personal favorites: Cafe Au Lait, Great Hercules, Shiloh Noelle, Blushing Lady, Kelvin Floodlight
Pictured above: Shiloh Noelle
Cactus/Semi-Cactus Dahlia
Cactus dahlias have petals that curl into themselves, stand upright, and end at a point, thereby creating a spiky look that inspired the name. They remind me a punk rocker hairstyle and I personally think they add the perfect amount of edginess to garden and flower arrangements.
How do Cactus and Semi-Cactus dahlias differ? Semi Cactus dahlias also have spiky petals, but unlike cactus dahlias, their petals only curl up less than half the length of the petal.
Many dahlias from this group present as a dinnerplate dahlia given their large size, so it truly is the quill like petal form that make them stand apart.
Personal Favorites: Myrtle’s Folly, Blackjack, My Love, Tsuki Yori

Pictured above: Tsuki Yori
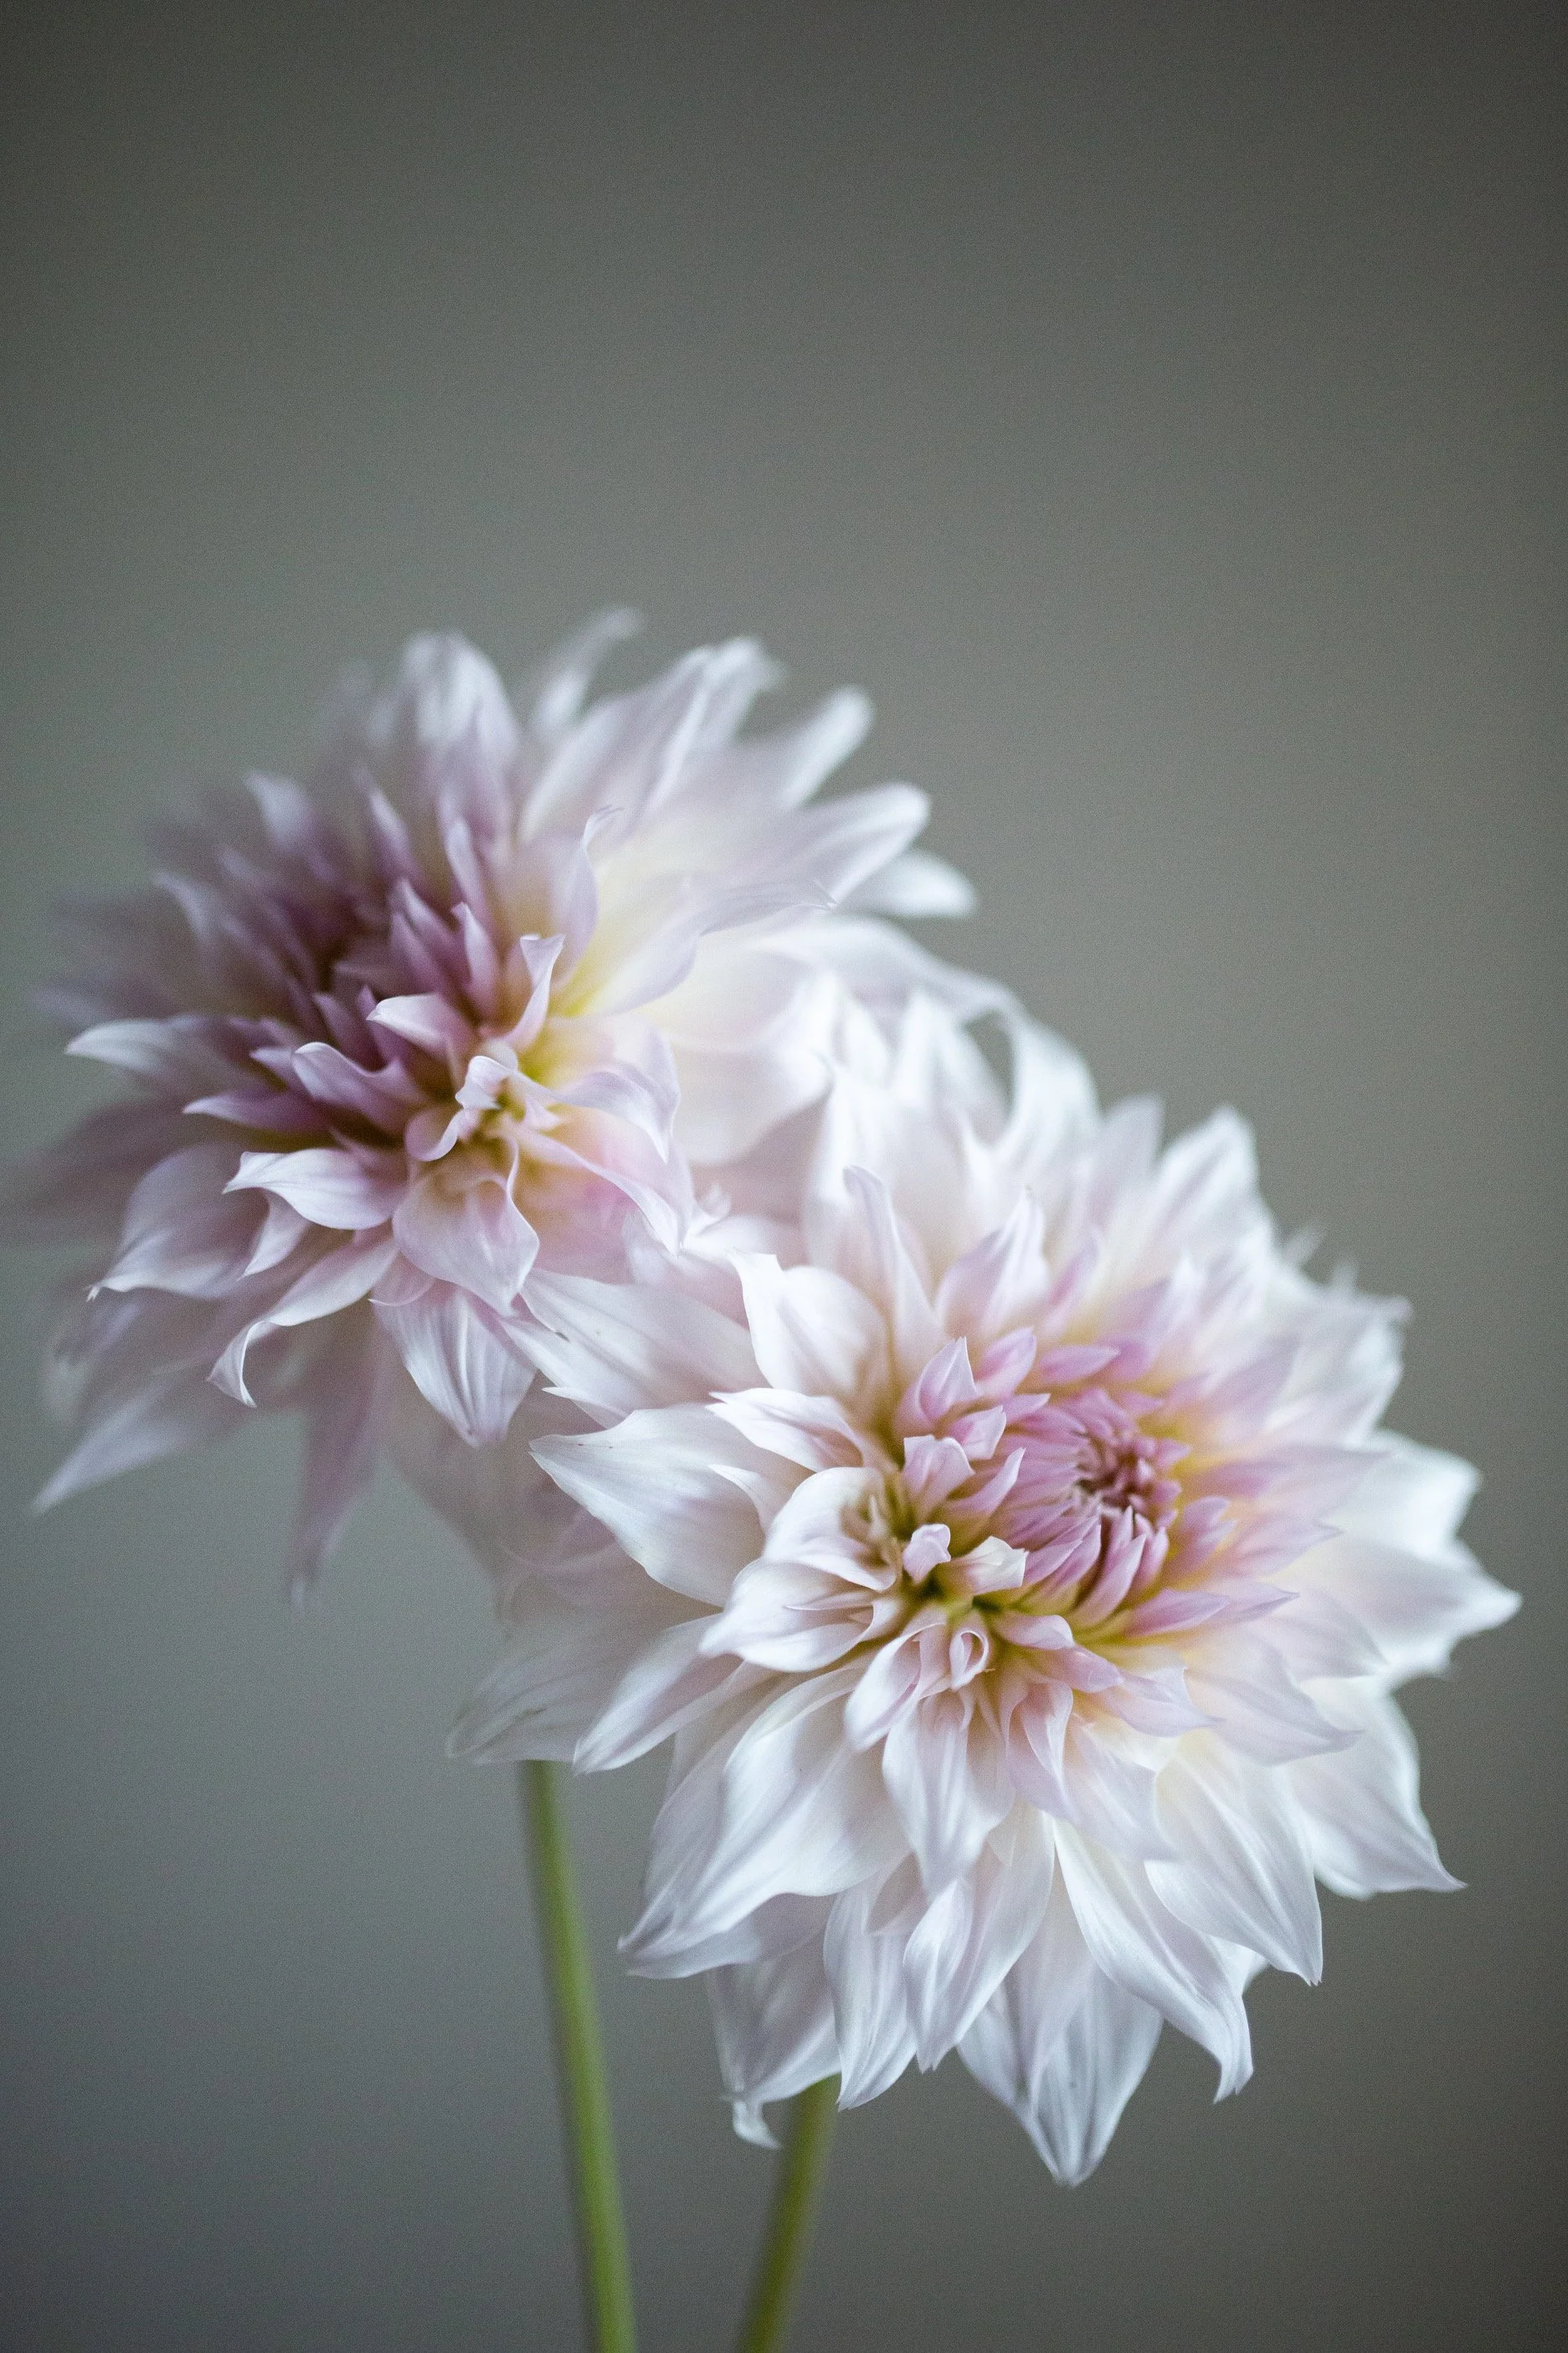
Anemone Dahlia
Anemone dahlias have a pin cushion center made up of tiny florets, surrounded by a ring of petals that resemble those of daisies. At first glance you may not even realize you’re looking at at a dahlia! They add a unique element to dahlia arrangements en masse, given their slightly non-dahlia appearance.
Personal Favorites: Platinum Blond, Totally Tangerine, Lifestyle

Pictured above: Totally Tangerine
Tips on using dahlias in gardens and flowering borders
When choosing where to place your dahlias, it’s important to note that every dahlia varies in height, typically ranging anywhere from 1-5 feet tall.
Dinnerplate, ball, and cactus dahlias tend to be in the 3-5 foot range, making them perfect for the back or middle of borders and gardens.
Pompons and anemone dahlia are typically in the 1-2.5 foot range, so they’re best at the front of borders or in large pots. Just be sure to give them a deep pot to grow in, as they like for their roots to be able to spread.
Also, because dahlias are later blooming, planting them amongst spring and mid summer flowers such as daffodils and cosmos (which will bloom before them) is good for gaining full season interest in a space.
If you want to give dahlias perennial flower partners to bloom alongside during late summer and early autumn, heirloom chrysanthemums and asters are two great picks.
Hope this inspires you to begin sourcing dahlias for spring planting, and be sure to check back to read about how to plant dahlia tubers - and seeds!
Naturalistic Holiday Tablescapes
Happy holidays!
In this season which is meant to be celebratory and exciting but can often become overwhelming and stressful, I wanted to share a couple of tablescape ideas that are beautiful yet simple - and draw from ye olden days when seasonality was a necessity and nature was the guide when it came to holiday decorating.
(Quick side note: though I completely understand that decorating can sometimes be part of what feels daunting during the holidays, creating a naturalistic tablescape can feel a bit meditative. With the “nature as your guide” approach, there’s the chance to pause and go out in nature to gather ingredients. And once you have all you need to prepare, there are no perfect lines to form, no perfect balls of flowers to shape, and the end result is a lush reminder of how the simple beauty of nature is abundant in all seasons.)
So first up, a look best suited for a large table, as this one involves footed compotes, lush greenery centerpieces, and bowls of extras to create an almost cornucopia effect.

Above is a sample on a 4 foot table: I imagine repeating the look for a longer table (and be sure to leave space for the dishes and glassware;)
Materials needed to recreate a similar look
Brass bowls in an assortment of sizes (Note: a footed bowl thrown into the mix will add interest with height variation, but it may block visibility across the table. This is perfect if you have guests who should avoid one another! But if you wish to not impede anyone’s vision, placing the tall footed bowl smack in the middle and leaving extra space at its sides should allow people to see around it.)
Mixed evergreen branches (Shown above are juniper, magnolia, cypress, and nandina stems + berries)
Fruit (pears, pomegranates, oranges, lemons, and cranberries are personal favorites for the holiday)
Pins and brown paper (if you wish to create place cards for the table, as shown above)
Brass candlesticks and/or candleabras + taper candles (a collection with mixed heights adds interest)
Table runner (not required, and please know that it may need to be one you’re okay with ruining for the open pomegranate look - they stain horribly but are so worth the look they provide when cut open)
To create the footed bowl centerpiece

Place a large flower frog in the bottom of the compote so greenery will stay in an upright fashion. It will still droop in a natural way, but without splaying out too far into the eating space.
Add water.
Begin adding in the heaviest stems first, in a triangular shape to evenly distribute weight. In my case, it was the magnolia branches. Then do the same triangular additions with another greenery, making sure there is height variation and insuring that there is some “spilling” happening around the edge of the bowl. Continue until you use all of the different greeneries. Then, I typically save berries for last, as I did with the nandina in my arrangement.
Do a 360 check to make sure there are no obvious holes and add in as needed!
This could also be done with one variety of evergreen, though be sure to compensate for the lack of textural interest by really making sure you have height variation amongst the stems.

In the other bowls
A similar approach can be done as was with the compote bowl for a structured look.
I also recommend making beds of evergreens and topping with fruit, and/or creating bowls of only fruits and cones (such as cranberries and magnolia seed pods), and/or creating bowls of only one type of fruit (either whole or cut up).
How to create place cards out of fruit
For a naturalistic look, I use slightly rumpled parchment paper (I just ball is up a little and flatten back out) with raw edges to write names onto. Then, I use a pin to poke it into the fruit. Simple as that! I used two different colors of pears for this example, but a mixture of different fruits would be an interesting look as well.

Once you have all of the above pieces prepared, it’s time to lay them out! As mentioned earlier, placing footed compotes first is ideal to ensure they’re not blocking guests’ vision (unless you want them to). Then, begin placing the bowls about 8-12 inches apart in a slightly off centered way (not a straight line, more like a slightly curved snake). Add in the candlesticks amongst the bowls as you wish (working in odd numbers with those is best), and finally, add in loose bits of fruit such as sliced pomegranates and oranges to lay along the runner. Lastly, put out your place cards, table setting, and glassware - and voila. A feast for the eyes to compliment the holiday feast.
Looking for something a little more simplistic but just as naturalistic?
Ditch the compotes and plethora of bowls, and instead allow your candlestick holders to be the focus amongst a single bowl of evergreens, fruit, and cones.

Using candle holders with a bit of a gutter around the stem opening is a great way to incorporate cranberries (or nuts and other dried fruits) around the table without a big spread.
These glass star shaped holders are vintage but easily found on Etsy or in other vintage shops. Using tea light holders is also an option: use Stick Um candle wax adhesive to hold the tapers in place and then put the fruit around them!
Playing with candle colors is also a way to make a big impact in a small tablescape. Go with dark colors to add a moody pop if you want to keep with a naturalistic color scheme, or go with bright reds or greens if you’re hoping to add umph to the muted greenery.
Lastly, little sprigs of greenery placed amidst the candle holders adds another dimension and can bring cohesiveness with a bit of whimy to the overall look.

Hope you find this helpful, and please let me know if you have any questions!
Planting a Bulb Lasagna
How to have flowers like this👇🏻 from a single pot….

Spring bulbs are one of the easiest things to plant and are also the quickest way to ensure that you have a lovely ower show to signal the end of winter.
The only tricky thing about them?
They are often the target of above and below ground creatures who are looking for a winter snack, and they can take up quite a bit of space in the landscape - which means you may be faced with picking and choosing from only a few to grow.
Then of course there may be the obstacle of not having any yard at all, but you’re still wanting that tulips/daodil/(list all the other owering spring bulb here) experience on your patio or porch.
The solution?
Planting a potted bulb lasagna!
Simply put, it's a layered approach to planting bulbs in a pot, with the goal of choosing owers that bloom at slightly dierent times to get the most out of your pot.
They're easy to plant and require next to no care if left outdoors to the elements, and this guide will help you know what you'll need to plant and includes 3 recipes to get your started.
Materials Required
Pots with drainage holes
Clay pots and vintage metal containers with holes nailed into the bottom work beautifully.
Quality potting mix
Black Kow and Coast of Maine are two personal favorite brands readily found .
Grit (the stone kind is what I'm talking about, but the internal kind is helpful, too) and a few medium sized stones
My favorite British growers swear by using horticultural grit to aid in drainage in their pots, but here in the states it's not commonly mentioned. So, you may get a confused look if you ask for help finding it in big box stores. Thankfully since plain horticultural grit is really just ground up stone, you can use basic poultry grit (i.e. crushed granite) to achieve the same results - with the bonus that it's cheaper and easier to find than horticultural grit.
Spring Flowering Bulbs
Tulips, allium, daffodils (narcissus), crocus, snowdrops, fritillaria, hyacinths, and muscari are tried and true favorites for bulb lasagna recipes - and many of those varieties come in a wide range of colors! It's best to choose 3 - 4 varieties of bulbs that bloom at different times - early, mid and late spring.
Suggested recipes

Allium Arctic Snow
Narcissus Ice King
A mix of Fritillaria Meleagris and Allium Moly

Mondial Tulip (or any tulip of your choice)
Hyacinth Gypsy Queen (or any hyacinth of your choice)
A mix of Muscari, Snowdrops, and Allium Azureum

Fritillaria Persica
Darwin Blushing Bride Tulip (or tulip of your choice)
Hyacinth White Pearl
Iris Reticulata + Snowdrops
Steps for Planting
Put a few medium sized stones loosely spaced in the bottom of the pot. This will help ensure water drains freely at the bottom.
Create a mix of compost and grit which you'll use to make your layers.
Put a layer of the above mix into the bottom of the pot.
Place the largest bulbs onto that layer, spacing about 1 inch apart.
Cover with compost.
Place the second largest bulbs in the second layer (with the exception of the
tulip/hyacinth recipes - hyacinth bulbs will be larger than tulips, but since
they're shorter, I put them in the second layer).
Cover with compost.
Place the smallest bulbs on the top layer.
Cover with compost.
Water with a gentle spray or watering can.
Place in a sunny spot that preferably will be moisture from morning dew, rain,
and snow throughout the winter. If you only have a porch, putting it at the edge of the porch should suffice, but be sure to make sure it doesn't stay bone dry for more than a week or two at a time.
If there is concern of squirrels digging in your pots, cover with a layer of bird netting or chicken wire to deter that from happening (but be sure to remove it as soon as you see green shoot start to appear).
Patiently wait for spring blooms and enjoy!
The mistake that led to total garden failure - and how I fixed it.
In February of 2023, a stroke of inspiration (most likely brought on by winter doldrums) told me to start planning a new garden space at the farm. Growing flowers in rows was starting to feel like an assembly line that was crushing my creativity, so I thought that the solution may be to designate a small square of space to create somewhat of a cottage garden - complete with a little stone path, vine wall and teepee, flowering perennials, and annuals sown throughout them.
So as winter began to fade, the garden plan was born. I kept the overall vision simple by choosing a mix of about 10 varieties of plants that I would repeat throughout the space, and all was installed by April 1. It was a hopeful space and in my dreams it was sure to become a lush and gorgeous getaway spot.
However, by the end of the season, this is what I was left with:

September 2023- not much better than April 1, 2023
The result was depressing and slightly defeating, but as gardeners do, I had to assess what I did wrong - and when I realized the biggest mistake I’d made (and fixed it this spring), the result at the same time as last year’s failure was this:

September 2024 - I chose a mainly green and white color scheme, which created a nice sense of calm within the space
So what was it that made such a drastic difference?
Location, location, location.
In 2023, I had failed to realize that WHERE I put the garden was just as important as what I put in it.
My initial thought had been to tuck the garden away from the hub of the farm so as to create a quiet zone I could escape to when a break from the grind was needed.
In theory, it made sense to have a spot that completely took me away from the never ending tasks of of the planting, weeding, harvesting, and floral designing.
In reality, those tasks are imperative to my daily routine and are always at the forefront of my mind - so putting a project so far outside the realm of where most of my existence at the farm was happening set it up for failure.
Very quickly the space feel victim to the old adage “out of sight, out of mind,” and demise ensued.
So by making the decision to start over in an entirely different spot - right next to the main field at the farm - I set myself for success in two ways:
Not only did I remember to actually take care of it because I walked by it frequently, but I also remembered to ENJOY it on a daily basis.
When a lush green space with a little chair is something you’re forced to see, at some point you’re going to let it beckon you in for a moment. I’ve stood in that space almost every day to simply watch the bees or follow the vine trails. Even if it’s just been for five minutes, it’s been five minutes of calm I was gifted thanks to the change of location.
In summary, please learn from my mistake and be sure to choose a garden spot you simply can’t ignore - even if it’s a patio garden, make sure it’s a patio that is part of your daily existence!
By choosing a space that’s already part of your day to day life, the garden will quickly become an enjoyable part of your routine instead of an added chore you’re likely to neglect. Then all the effort and time spent in tiny daily time spans will be greatly rewarded in the form of a beautiful space that you (and the pollinators) will never forget to enjoy.
Which brings me to one more quick tip to help give you success (and take some work off your back in the spring): if you can find the time, starting a garden by planting perennials this fall will not only help lay a foundation for which you can plant annuals amongst next spring, but it will also allow those perennial roots to strengthen so they won’t have to be babied in the spring. You’ll gain about 6 months of growth by planting in fall versus in the spring, all thanks to giving them a nice time to rest while the magic is happening underground.
Favorite perennials for planting in October and November include peonies, hellebores, flowering shrubs (forsythia, mock orange, ninebark, abelia), and clematis vine.
Hope that’s helpful, and as always, you can schedule a garden consult if you’re hoping for more customized advice on how to create a garden that thrives and inspires.
foraged greenery for August flower arrangements
Though I love to grow greenery and herbs for floral arranging purposes, there’s something fun about going into nature to find wild and rambling bits - especially at the height of summer season, where so much can typically be found.
So today I’m sharing my top three favorite foraged greenery to look for in the month of August here in central Virginia. Starting with….
Elaeagnus

Elaeagnus (also known as Silverberry or Autumn Olive) is a non native you’ve most likely seen along roadways or in open fields in Virginia. You may have even seen small shrubs of it for sale at a nursery, but it is one that I would not recommend planting due to its highly invasive nature. Seriously, plant one and you may end up with 100 in just a few years. Which isn’t really a good thing since it often keeps other beneficial and native pollinator plants from growing in its shade.
However, given that it’s so readily found already existing in nature, I would recommend foraging from it to use in floral arrangements. Not only does it look beautiful and have good vase life, but by foraging it this month (when the berries start to appear) you’re helping to keep those seeds from spreading all around. Also, the berries are edible, and though not the most delicious, that’s good news given that there’s no concern in bringing it into your home around pets and children! Of course you can also just take the berries off and discard of them (in a trash can, not a compost pile), if you wish to have just greenery visible.

A bridal bouquet made with elaeagnus as the greenery base (photo by Hannah Malloy Photography)
Once you’re done foraging from a particular shrub, at some point within the month, cutting it all the way back to the ground is best. I promise you it’ll grow back (you really have to dig it up to officially get rid of it), but again, cutting it back keeps it from multiplying at an unhealthy rate.
And if you’re at all curious to learn more about how this particular invasive species came to be so prevalent in our landscape, I found this wonderful article by Lewis Ginter:
https://www.lewisginter.org/elaeagnus/
Wild Blackberry Vine

Ah, the most exciting vine of summer. The fruit that appeared in July has started to fade by now, but the lovely vine of wild blackberry is still very green and wonderful to weave into arrangements: just be sure to take caution when harvesting, as the thorns aren’t very forgiving of fingertips grabbing onto them.
I personally harvest in leather gloves, and then before putting the stems into water, I strip the thorns by gently scraping with a knife or edge of scissors so positioning stems in a vase won’t be so threatening. The sturdy stems and leaves have a droopy but not-too-droopy form that makes it wonderful for creating a base layer in a vessel before weaving in flowers among them.
Virginia Ground Cherry (Physalis virginiana)

This one is a bit trickier to find than the previous two due to its short nature and easy ability to hide, making it all the more special when it does appear! Growing only 1-2 feet tall, you’ll most likely notice its tubular, off white/maroon tinged flowers first. Then, if you look more closely, you’ll find beautiful green paper lantern like orbs hiding under the leaves. Those contain either green berries or ripened red-orange berries (which typically occurs in late August).
To harvest for floral arrangement, cut as low down on the stem as possible and strip enough leaves so that there won’t be any sitting in water. Then, I would recommend arranging the flowers first and then tucking this ingredient in last, around the edges to allow it to peek out. It’s not the strongest stem, so using it as a base layer or grid isn’t recommended. It’ll definitely be a conversation starter for anyone who sees the arrangement, and I’ve found it can last for up to two weeks in a vase!

Hope this is helpful, and happy foraging!
-
May 2026
- May 23, 2026 A week in the Garden, 5/17-5/22 May 23, 2026
- May 17, 2026 A week in the Garden, 5/9-5/16 May 17, 2026
- May 8, 2026 A week in the Garden, 5/2-5/8 May 8, 2026
- May 1, 2026 A week in the Garden, 4/27-5/1 May 1, 2026
-
November 2025
- Nov 14, 2025 Bulb Lasagnas Nov 14, 2025
-
October 2025
- Oct 14, 2025 Hellebores: the perfect shade loving flower of early spring Oct 14, 2025
-
July 2025
- Jul 29, 2025 Real Wedding Inspo, A la Carte Style Jul 29, 2025
- Jul 7, 2025 July Flower of the Month: Lisianthus Jul 7, 2025
-
June 2025
- Jun 2, 2025 What to plant in June Jun 2, 2025
- Jun 2, 2025 June Jobs for the Garden Jun 2, 2025
-
May 2025
- May 5, 2025 Moody Flowering Planter Recipe May 5, 2025
- May 5, 2025 May Flower Focus: Peonies May 5, 2025
-
April 2025
- Apr 6, 2025 April Flower Focus: Ranunculus Apr 6, 2025
- Apr 6, 2025 Planting dahlia tubers indoors Apr 6, 2025
-
March 2025
- Mar 2, 2025 March Flower Focus: Anemones Mar 2, 2025
-
February 2025
- Feb 27, 2025 Favorite Flowering Shrubs Feb 27, 2025
-
January 2025
- Jan 28, 2025 My Five Favorite Dahlia Forms (and how to incorporate them into your garden) Jan 28, 2025
-
December 2024
- Dec 11, 2024 Naturalistic Holiday Tablescapes Dec 11, 2024
- Dec 11, 2024 Planting a Bulb Lasagna Dec 11, 2024
-
September 2024
- Sep 29, 2024 The mistake that led to total garden failure - and how I fixed it. Sep 29, 2024
-
August 2024
- Aug 5, 2024 foraged greenery for August flower arrangements Aug 5, 2024
-
June 2024
- Jun 24, 2024 Four flower seeds to sow in June to enjoy a late summer harvest Jun 24, 2024
-
April 2024
- Apr 23, 2024 Four mosquito repellent plants to add to your patio Apr 23, 2024
-
March 2024
- Mar 25, 2024 My Garden Tool Must Haves Mar 25, 2024
- Mar 9, 2024 The best dry-able flowers for Virginia gardens Mar 9, 2024
-
February 2024
- Feb 29, 2024 The best flowering vines for Virginia gardens Feb 29, 2024
- Feb 27, 2024 For Virginia flower growers: Sourcing Perennials Feb 27, 2024
- Feb 9, 2024 Where to find incredible flower seeds Feb 9, 2024
-
January 2024
- Jan 31, 2024 Hardy Annuals Jan 31, 2024
-
December 2023
- Dec 13, 2023 Holiday Gift Ideas for Flower Lovers and Growers Dec 13, 2023
-
March 2023
- Mar 3, 2023 Flower Garden Documentaries to Inspire Mar 3, 2023
-
January 2023
- Jan 20, 2023 Valentine's Day Jan 20, 2023
-
January 2022
- Jan 12, 2022 Thoughts on Weddings Jan 12, 2022
- Jan 10, 2022 2021 Recap Jan 10, 2022
-
November 2021
- Nov 2, 2021 Growing Ranunculus Nov 2, 2021
-
March 2020
- Mar 17, 2020 Early Spring Planting In Virginia Mar 17, 2020
-
December 2019
- Dec 6, 2019 The Beginning Dec 6, 2019